728x90
그림판 구현 03 - 그림판 만들기2
이미지 넣기
이미지 파일을 넣을 수 있는 input 을 만들어줍니다.
img input 에는 비디오도 넣을 수 있기 때문에, 파일 타입을 설정해줍니다.

```html
<input type="image" accept="image/*" id="file">
```

이젠 자바스크립트에서 사진요소를 불러오고,

```javascript
const fileInput = document.getElementById("file");
```

불러온 파일을 다음 순서로 가공합니다.
1. 발생된 이벤트의 그림데이터를 가져옵니다.
2. 그림데이터의 url을 만듭니다.
3. 새로운 이미지 변수를 만들어 url을 할당해줍니다.
4. 이미지 요소의 값을 null로 만들어줍니다.

```javascript
function onFileChange(event) {
    const file = event.target.files[0];
    const url = URL.createObjectURL(file)
    const image = new Image();
    image.src = url;

    image.onload = () => {
        ctx.drawImage(image, canvas.width, canvas.height); // x, y, width, height
        fileInput.value = null;
    }
}

fileInput.addEventListener("change", onFileChange);
```
텍스트 넣기
텍스트를 입력하고 더블클릭을 하면 텍스트가 나타나게 합니다.

텍스트 입력을 받을 input을 만들어줍니다.

```html
<input type="text" placeholder="Write text" id="text">
```

텍스트 요소를 불러옵니다.

```javascript
const textInput = document.getElementById("text");
```

불러온 텍스트 요소에 이벤트리스너를 적용합니다.

```javascript
function onDoubleClick(event) {
    if (text !== "") {
        ctx.save();
        const text = textInput.value;
        ctx.lineWidth = 1;
        ctx.font = "48px sans-serif";
        ctx.strokeText(text, event.offsetX, event.offsetY);
        ctx.restore();
    }
}

canvas.addEventListener("dblclick", onDoubleClick);
```

`ctx.save()`는 이전 상태를 저장하고, `ctx.restore()`는 `ctx.save()`의 상태로 되돌아가는 역할을 합니다.
이미지로 저장
그림판에 저장된 그림을 이미지로 저장합니다.
캔버스를 저장하는 버튼을 만들어줍니다.
<button id="save">Save as image</button>download url을 생성하고 link로 이동하게 하는 함수를 불러온 요의 이벤트로 추가합니다.
saveBtn = document.getElementById("save");

function onSaveClick(event) {
    const url = canvas.toDataURL();
    const a = document.createElement("a");
    a.href = url;
    a.download = "painting.png";
    a.click();
}

saveBtn.addEventListener("click", onSaveClick);
마지막!!! - CSS
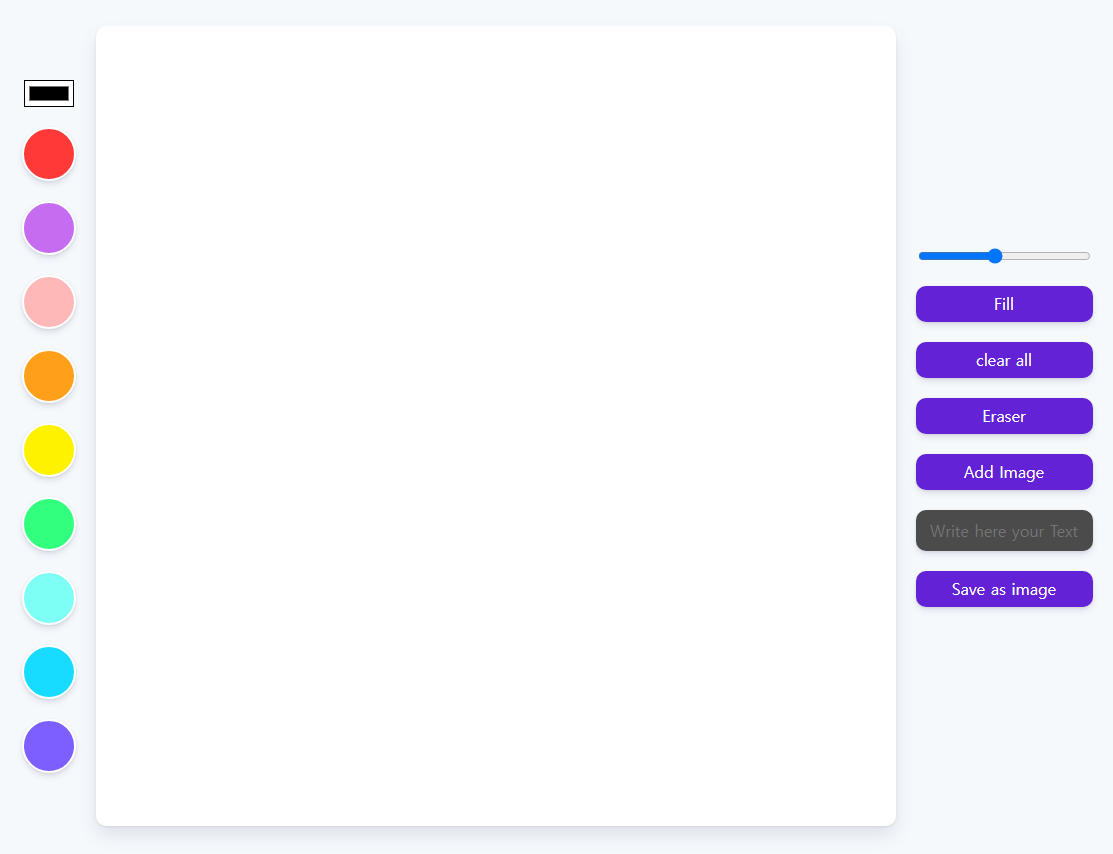
예쁘게 만들어봅니당...
- index.html
<!-- index.html --> <!DOCTYPE html> <html lang="en"> <head> <meta charset="UTF-8"> <meta name="viewport" content="width=device-width, initial-scale=1.0"> <title>Document</title> <link rel="stylesheet" href="style.css"> </head> <body> <div class="color-options"> <input type="color" id="color" /> <div class="color-option" style="background-color: #ff3838;" data-color="#ff3838"></div> <div class="color-option" style="background-color: #c56cf0;" data-color="#c56cf0"></div> <div class="color-option" style="background-color: #ffb8b8;" data-color="#ffb8b8"></div> <div class="color-option" style="background-color: #ff9f1a;" data-color="#ff9f1a"></div> <div class="color-option" style="background-color: #fff200;" data-color="#fff200"></div> <div class="color-option" style="background-color: #32ff7e;" data-color="#32ff7e"></div> <div class="color-option" style="background-color: #7efff5;" data-color="#7efff5"></div> <div class="color-option" style="background-color: #18dcff;" data-color="#18dcff"></div> <div class="color-option" style="background-color: #7d5fff;" data-color="#7d5fff"></div> </div> <canvas></canvas> <div class="btns"> <input id="line-width" type="range" min="1" max="10" value="5" step="0.1" /> <button id="mode-btn">Fill</button> <button id="destroy-btn">clear all</button> <button id="eraser-btn">Eraser</button> <label for="file"> Add Image <input type="file" accept="image/*" id="file" /> </label> <input type="text" placeholder="Write here your Text" id="text"> <button id="save">Save as image</button> </div> <script src="app.js"></script> </body> </html>- reset.css
// reset.css html, body, div, span, applet, object, iframe, h1, h2, h3, h4, h5, h6, p, blockquote, pre, a, abbr, acronym, address, big, cite, code, del, dfn, em, img, ins, kbd, q, s, samp, small, strike, strong, sub, sup, tt, var, b, u, i, center, dl, dt, dd, ol, ul, li, fieldset, form, label, legend, table, caption, tbody, tfoot, thead, tr, th, td, article, aside, canvas, details, embed, figure, figcaption, footer, header, hgroup, menu, nav, output, ruby, section, summary, time, mark, audio, video { margin: 0; padding: 0; border: 0; font-size: 100%; font: inherit; vertical-align: baseline; } /* HTML5 display-role reset for older browsers */ article, aside, details, figcaption, figure, footer, header, hgroup, menu, nav, section { display: block; } body { line-height: 1; } ol, ul { list-style: none; } blockquote, q { quotes: none; } blockquote:before, blockquote:after, q:before, q:after { content: ''; content: none; } table { border-collapse: collapse; border-spacing: 0; }- style.css
  // style.css
  @import "reset.css";

  body {
      display: flex;
      gap:20px;
      justify-content: space-between;
      align-items: flex-start;
      background-color: #f6f9fc;
      padding:40px;
  }

  canvas {
      width:800px;
      height:800px;
      background-color: white;
      border-radius:10px;
      box-shadow: 0 10px 18px rgba(50, 50, 93, 0.11), 0 1px 3px rgba(0, 0, 0, 0.08);
  }

  body {
      display: flex;
      justify-content: center;
      align-items: center;
  }

  .btns {
      display: flex;
      flex-direction: column;
      gap:20px;
  }

  .color-options {
      display: flex;
      flex-direction: column;
      gap:20px;
      align-items: center;
  }
  .color-option {
      width:50px;
      height: 50px;
      border-radius: 50%;
      cursor: pointer;
      border:2px solid white;
      transition:transform ease-in-out .1s;
      box-shadow: 0 4px 6px rgba(50, 50, 93, 0.11), 0 1px 3px rgba(0, 0, 0, 0.08);

  }
  .color-option:hover {
      transform: scale(1.2);
  }
  input#color {
      background-color: white;
  }

  button,
  label {
      all:unset;
      padding:10px 0px;
      text-align: center;
      background-color:rgb(100, 34, 214);
      color:white;
      font-weight: 500;
      cursor: pointer;
      border-radius: 10px;
      transition: opacity linear .1s;
      box-shadow: 0 4px 6px rgba(50, 50, 93, 0.11), 0 1px 3px rgba(0, 0, 0, 0.08);
  }

  button:hover {
      opacity: 0.85;
  }

  input#file {
      display: none;
  }

  input#text {
      all:unset;
      padding:10px 0px;
      border-radius: 10px;
      font-weight: 500;
      text-align: center;
      background-color: rgb(75, 75, 75);
      color: white;
      box-shadow: 0 4px 6px rgba(50, 50, 93, 0.11), 0 1px 3px rgba(0, 0, 0, 0.08);
  }


반응형
'실시간 협업 그림판 만들기' 카테고리의 다른 글
| 실시간 협업 그림판 만들기 02 - 그림판 구현하기 02. 그림판 만들기 (1) | 2024.07.18 |
|---|---|
| 실시간 협업 그림판 만들기 01 - 그림판 구현하기 01. CANVAS 이해하기 (1) | 2024.07.17 |
